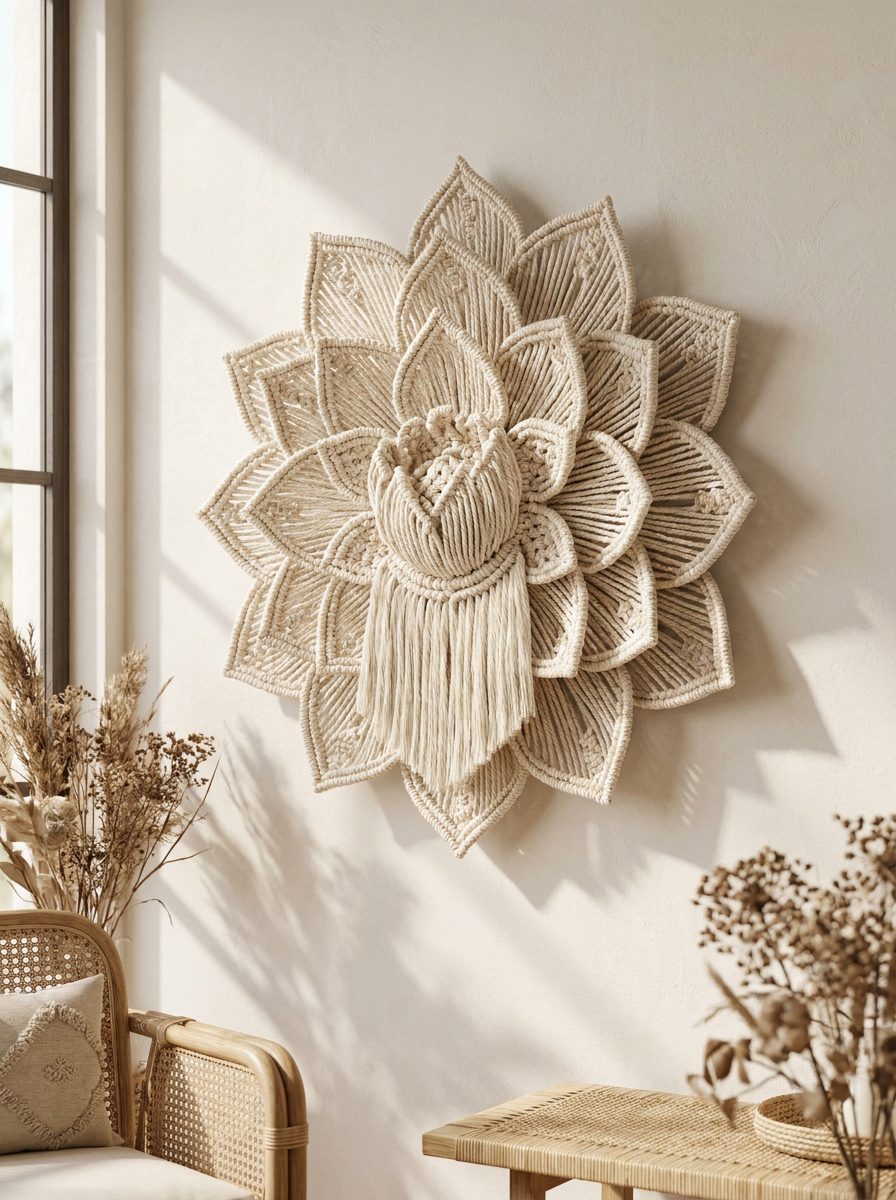
Creating a three-dimensional lotus macrame wall hanging is one of the most rewarding fiber art projects you can undertake. With its blossoming layers of sculptural petals, circular mandala base, and delicate textured center, this statement piece brings serenity and organic beauty to any interior space.
While traditional fiber art often lies flat against the wall, this lotus macrame wall hanging builds outward using concentric metal hoops, structural double half hitch knot ridges, and contoured petal shaping. Whether you are transitioning from a classic macrame wall hanging pattern or looking to explore advanced 3D knotting, this comprehensive guide provides every step, measurement, and technique needed to craft your own floral masterpiece.
You can even pause after completing the foundation to produce a flat mandala decorative tray before continuing with the layered petals. Let us explore the materials and knot sequences required to bring this botanical sculpture to life for your lotus macrame wall hanging project.
Essential Materials and Tools Checklist
Before cutting your cords, gather your supplies to ensure consistent tension and flawless petal layering throughout this lotus macrame wall hanging.
- Macrame Cord: 4mm single-twist or 3-ply cotton macrame cord in Natural unbleached cream (approx. 200–220 meters total).
- Metal Ring Foundation (Small): 1 x 5.5-inch (14 cm) metal or brass craft hoop.
- Metal Ring Foundation (Large): 1 x 12-inch (30 cm) metal or brass craft hoop.
- Scissors: Heavy-duty craft shears for clean cord trimming.
- Measuring Tape: Standard tailor measuring tape for precise cord preparation.
- Finishing Notions: Steel fringe comb or pet slicker brush, plus a crochet hook or tapestry weaving needle for tucking ends.

Step-by-Step Guide to Making Your Lotus macrame wall hanging
Precise Cord Cutting Guide
To avoid cord waste while ensuring adequate working length for dense double half hitch knots, cut your 4mm cotton cord into the following dedicated groups: for your lotus macrame wall hanging project.
- Part 1 — Center Base & Outer Tray:
- Center Foundation Loop: 1 x 40 cm (16 inches)
- Center Petal Mounts: 12 x 200 cm (79 inches)
- Inner Ring Anchors: 1 x 40 cm (16 inches) and 1 x 50 cm (20 inches)
- Ring Expansion Cords: 24 x 160 cm (63 inches)
- Mid-Band Anchors: 1 x 80 cm (32 inches) and 1 x 100 cm (39 inches)
- Outer Rim Cords: 24 x 110 cm (43 inches)
- Part 2 — Layered 3D Lotus Petals & Fringe:
- Tier 2 & Tier 3 Petal Strands: 156 x 105 cm (42 inches)
- Innermost Petal Strands: 36 x 90 cm (36 inches)
- Center Core Fringe Accents: 15–20 cm (6–8 inches) scrap cord cuttings
Core Knot Techniques and Foundation Ring Setup
this lotus macrame wall hanging utilizes four essential knot types combined in structural geometries. Familiarizing yourself with these techniques ensures smooth workflow and uniform petal tension:
- Lark’s Head Knot & Reverse Lark’s Head: The essential mounting knot used to secure folded cords over hoops and foundation loops.
- Double Half Hitch Knot (DHH): The primary structural knot that creates dense diagonal, vertical, and concentric circular lines. Understanding how to maintain a taut anchor cord is critical according to fiber art principles found in the history and structure of traditional macrame.
- Reverse Lark’s Head Plus Half Hitch (RLHPHH): A reinforced mounting variation where a Reverse Lark’s Head is locked on both sides with extra half hitches, broadening the attachment point across the rings.
- Square Knot (SK): The classic 4-strand balancing knot used to form inverted triangular centers for each lotus petal.
Crafter Tip: For miniature practice before taking on this full-sized wall hanging, try making a mini macrame lotus keychain to master petal shaping on a smaller scale for your lotus macrame wall hanging project.

Step-by-Step Instructions: Part 1 — Mandala Base and Outer Petals
Follow these detailed steps to build the sturdy structural foundation of your lotus macrame wall hanging.
Phase 1: Center Medallion & 5.5-Inch Ring Attachment
- Steps 1–3 (Center Loop): Take the 40 cm anchor cord and form a closed circular loop. Mount 10 cords (200 cm each) onto the loop using Reverse Lark’s Head knots.
- Steps 4–5 (Close Center): Overlap the working ends of your anchor loop and attach the remaining 2 cords (200 cm each) over both overlapping strands with Reverse Lark’s Head knots. Pull the anchor cord tails firmly to close the central opening.
- Steps 6–8 (First Concentric Ring): Using a new 40 cm anchor cord positioned horizontally across the radial strands, tie a complete circle of Double Half Hitch (DHH) knots around the circumference, leaving approximately 1 cm of negative space between knots.
- Steps 9–11 (Ring Closure): When 2 cords remain, overlap the lead and tail of the 40 cm anchor cord, knotting the final two working cords over the doubled strands to lock the circle.
- Steps 12–15 (Second Spaced Ring): Introduce a 50 cm cord as your next anchor line. Knot a second concentric row of DHH knots leaving a 1-inch (2.5 cm) gap from the previous row. Distribute knots evenly around the circle.
- Steps 16–19 (Mounting the 5.5″ Ring): Place your 5.5-inch metal ring over the work. Secure all radial cords directly onto the metal hoop using tight DHH knots. Then, mount one 160 cm cord in between each existing knot along the ring using Reverse Lark’s Head knots.
Phase 2: 12-Inch Ring Expansion & Outer Base Petals
- Steps 20–24 (Expanding to 12″ Ring): Add two consecutive rows of DHH knots using the 80 cm and 100 cm cords as anchors. Position the 12-inch metal ring over the expanded disc and secure all cords onto the larger hoop using DHH knots.
- Steps 25–27 (Petal Sectioning): Divide the cords around the 12-inch ring into six equal sections of 6 knot groups. Attach 2 x 120 cm cords using Reverse Lark’s Head knots into each gap between sections.
- Steps 28–30 (Square Knot Triangles): For each of the six sections, isolate 20 cords. Using the middle 12 cords, create an inverted triangle pattern of Square Knots (starting with 3 square knots, then 2, then 1).
- Steps 31–36 (Shaping Petal Ridges): Make 2 V-shaped diagonal rows of DHH knots along both outer edges towards the center point. For the next 2 rows of DHH knots, increase tension firmly on the anchor cords; this deliberate tension causes the outer petal to curl gracefully forward.
- Steps 37–43 (Closing the Petal Peak): Use the outermost left and right cords as leading anchors for 2 final diagonal DHH rows. In the last row, incorporate the working cord into the anchor bundle, trim off the excess, and finish with a central joining DHH knot.
- Steps 44–48 (Finishing Base Petals): Repeat steps 28–43 for all 6 outer petals. Trim excess working tails on the reverse side and weave them securely into the back mesh using a tapestry needle.
Step-by-Step Instructions: Part 2 — Multi-Tiered 3D Lotus Petals
With your base mandala complete, you will now layer inward-facing 3D petals directly onto the exposed structural loops between rings, building realistic floral depth for your lotus macrame wall hanging project.
Phase 3: Middle Petal Layer
- Steps 49–50 (Mounting Middle Petal Cords): Locate the cord bridge loops between the outer base petals on the 12-inch ring. Attach 10 cords (105 cm each) in each section using Reverse Lark’s Head knots.
- Steps 51–55 (Triangle Core & Angled Ridges): Knot an inverted Square Knot triangle using the middle 12 cords. Work 4 diagonal rows of V-shaped DHH knots using the outer 4 cords on each side, angling sharply toward the petal tip.
- Steps 56–63 (Petal Tapering & Edge Trimming): Add a 5th row of V-shaped DHH knots. Close the petal edge by utilizing the far left 2 cords as anchors for DHH knots, bundling working cords progressively and trimming flush behind the ridge. Join the center with a final DHH knot.
- Step 64: Repeat around the ring to produce 6 offset middle petals.


Phase 4: Inner Petal Layer & Center Floral Core
- Steps 65–67 (Third Petal Tier): Repeat the petal construction in the upper tier directly above the middle layer, creating 6 overlapping petals positioned between previous gaps.
- Steps 68–75 (Fourth Petal Tier): Attach 6 cords (105 cm each) onto the alternating loops of the next inner row. Tie 1 center Square Knot, frame with 6 V-shaped DHH rows, pull anchors firmly to cup the petal forward, and close the tip. Repeat 5 times around the circle.
- Steps 76–87 (Innermost Bud Petals): Mount 4 cords (90 cm each) onto the 4 smallest inner loops. Form 1 central Square Knot, attach an additional cord on each flank with Reverse Lark’s Head knots, and complete 3 dense V-shaped DHH rows to create tightly curled center petals. Repeat 5 times.
- Steps 88–93 (Center Fringe & Weaving): Attach 15–20 cm scrap cords with Lark’s Head knots directly onto the innermost exposed loop ring. Comb through the fibers with a fringe comb and trim into a dense, velvety central pistil tuft. Neatly weave all reverse cord tails through the back loops.
Crafter Insight: If you enjoy crafting home decor with dimensional knots, you will also love making a DIY macrame plant hanger or an easy macrame bracelet tutorial to refine your tension control for your lotus macrame wall hanging project.
Pro Crafter Tips, Petal Shaping & Fringe Care
Achieving the signature sculptural look of this wall hanging requires attention to tension, fiber direction, and post-knotting care: for your lotus macrame wall hanging project.
- Mastering the 3D Petal Curl: To make petals lift off the wall, gradually increase tension on your anchor cord during the outer 2–3 rows of double half hitches. Tighter anchor cords force the fabric to cup upward naturally without needing wire supports.
- Ensuring Symmetrical Petal Alignment: Keep your diagonal DHH angles consistent by pointing your leading anchor cord directly at the center point of the petal triangle before knotting.
- Combing and Trimming the Center Core: Use a metal pet slicker brush or fine-tooth comb to separate the cotton plies of your center fringe. Hold scissors flat against the disc and trim gradually in small increments to achieve a dense, even finish.
- Cord Standard Reference: When substituting yarns or cords, ensure fiber weights align with standard textile gauges specified by the Craft Yarn Council standard yarn weight system for structural consistency.
- Wall Hanging Placement: Hang your completed lotus using a discreet mounting nail behind the 12-inch ring. Gently fluff and arrange the petal layers forward with your fingers once mounted.
Troubleshooting & Frequently Asked Questions
Why are my outer mandala rings buckling instead of laying flat?
Buckling usually occurs when knots are packed too tightly together along the anchor cord or when tension is uneven. Ensure you maintain the specified 1 cm to 1-inch negative spacing between concentric rings during Part 1, allowing the circular plane to expand evenly for your lotus macrame wall hanging project.
Can I use single-strand cord instead of 3-ply twisted cord?
Yes. A 4mm single-strand cotton cord produces a velvety, ultra-soft fringe in the center and smoother petal ridges. However, 3-ply twisted cotton cord provides slightly firmer structural rigidity, which helps the 3D petals maintain their cupped shape over time for your lotus macrame wall hanging project.
How do I clean and dust my finished macrame wall hanging?
Dust your wall hanging periodically using a hairdryer on its cool, low setting or a soft lint roller. Avoid washing the piece in water, as soaking can distort the tension and cause the combed fringe center to lose its shape for your lotus macrame wall hanging project.